Embarking on embedded systems development can be daunting, especially when faced with the complexity of programming and configuring STM32 microcontrollers. For both beginners and experts alike, navigating through the myriad of tools and options available can often seem overwhelming, presenting a significant barrier to creativity and innovation.
Enter the STM32CubeIDE: a revolutionary integrated development environment designed to simplify and streamline the development process for STM32 boards. This guide offers a step-by-step tutorial to unlock the capabilities of STM32 Cube IDE, ensuring developers can fully leverage the power of STM32 microcontrollers with ease and efficiency, transforming challenges into opportunities for groundbreaking solutions.

Introduction
The world of embedded systems is both intricate and exhilarating, with STM32 microcontrollers standing out as a cornerstone in modern electronics. STM32CubeIDE is a pivotal tool for developers who aim to harness the full potential of STM32 boards. In this comprehensive guide, we’ll embark on a journey to explore STM32CubeIDE, an integrated development environment that combines a rich set of features with simplicity, ensuring a seamless experience for both novice and experienced developers.
Understanding the Basics
What is STM32?
Before diving into the IDE, it’s crucial to understand what STM32 represents. STM32 is a family of 32-bit microcontroller integrated circuits by STMicroelectronics. The STM32 chips are grouped into various lines that cater to a wide range of applications.
The Role of STM32 Cube IDE
STM32CubeIDE is an all-in-one multi-OS development tool, which is part of the STM32Cube software ecosystem. It is designed to provide a smooth and efficient way to develop applications for STM32 microcontrollers and microprocessors.
2. Prerequisites
Before diving into the world of STM32 development, there are a few prerequisites that need to be addressed. These essentials ensure that you have all the necessary tools and knowledge at your disposal to make the most out of the STM32CubeIDE.
2.1 Hardware
- STM32 board: A physical STM32 development board is necessary for testing and debugging your applications. There are various STM32 boards available, catering to different needs and complexity levels. Choose one that best fits the requirements of your project.
- A USB cable to connect the STM32 board to your computer.
- An external power source, if required by your STM32 board.
2.2 Software
- STM32CubeIDE: The primary software tool for this tutorial. It is available for Windows, Linux, and macOS. Ensure that you download the latest version from the official STMicroelectronics website to take advantage of the newest features and updates.
Setting Up Your Environment
Installation Process
Setting up the STM32CubeIDE is straightforward. We will guide you through the installation process, ensuring you have a ready-to-use development environment.
Navigating the STM32 Cube IDE
Once installed, understanding the layout and features of the STM32 IDE is essential. We will explore the various menus, toolbars, and views that are part of the IDE.
Creating Your First Project
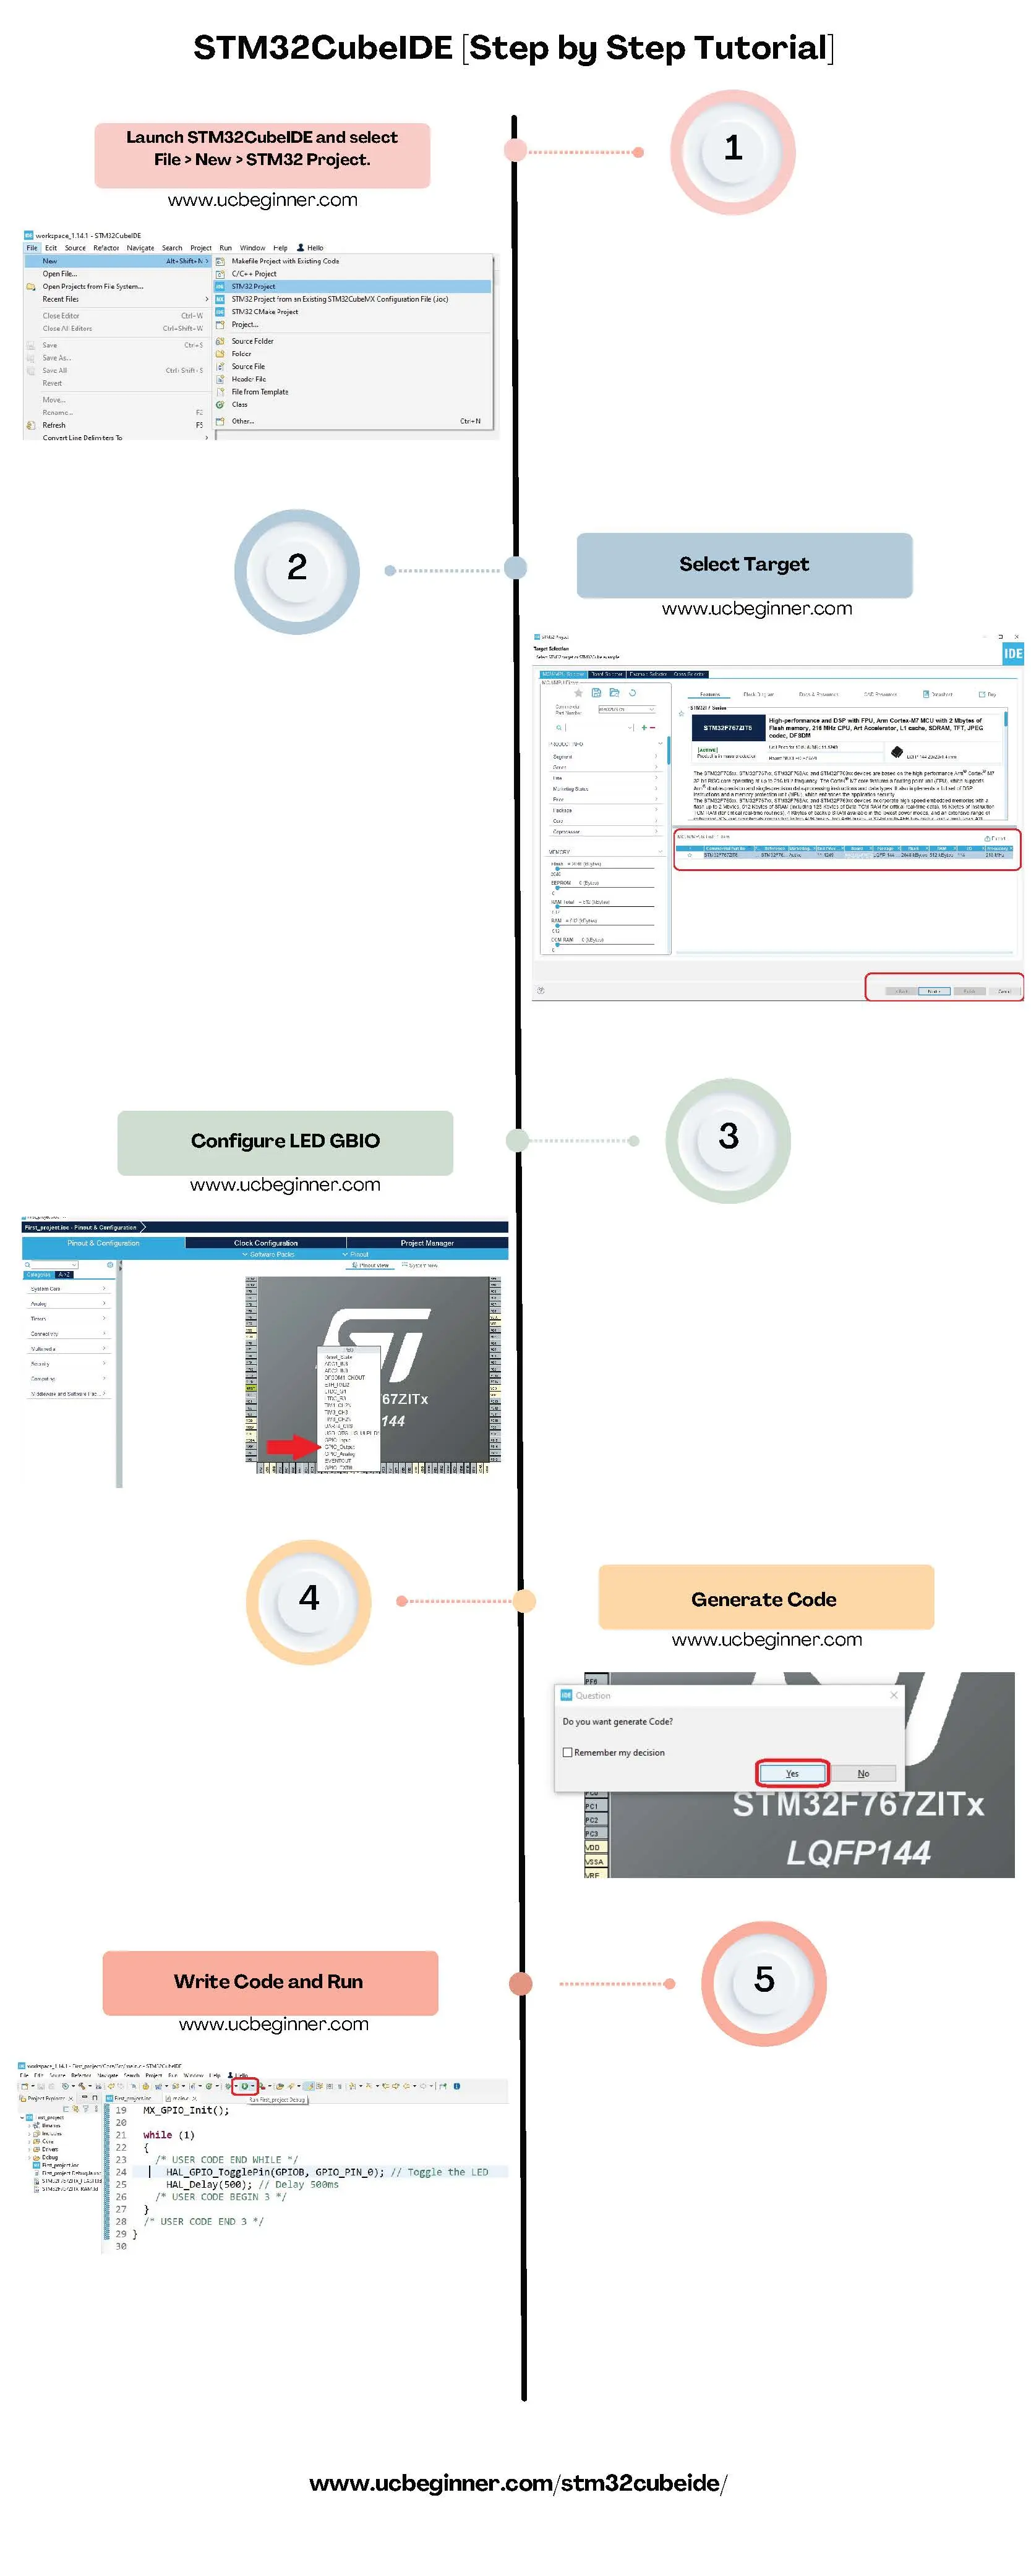
3.1 Create a new project[See Infographic]
- Launch STM32CubeIDE and select File > New > STM32 Project.
- The Target Selection window appears. Here, you can search for your STM32 microcontroller or STM32 board by part number or name[In our case STM32 Nucleo-144 development board]. Once selected, click Next.
- Configure your project settings, including project name and location. Configure GPIO PB0 as output.
- Ctr+S then generate the project/Code (click ‘Yes’) and write code following code.
- Attached STM32 Board the Build project and click ‘Run’.
3.2 Understanding project structure
Upon creating a new project, STM32CubeIDE presents a structured view of your project’s files and resources. Familiarizing yourself with this structure is crucial for efficient development.
- Inc and Src folders contain your project’s header and source files, respectively.
- The Drivers folder houses the HAL (Hardware Abstraction Layer) and LL (Low Layer) drivers, facilitating hardware abstraction for easier coding.
- .cproject and .project files are Eclipse-based configuration files used by STM32CubeIDE.
- The MX Project (.ioc) file is where STM32CubeMX stores the configuration of your STM32 microcontroller or microprocessor.
3.3 Adding user code
- To add your code, navigate to the Src/main.c file. STM32CubeIDE provides markers such as
/* USER CODE BEGIN */and/* USER CODE END */to indicate safe areas where you can write your custom code without it being overwritten by the STM32CubeMX code generator. - Implement your application logic within these sections. For example, to blink an LED, you would configure the appropriate GPIO pin as output and toggle it within the main loop.
3.4 Build project
- To build your project, click on the Build button (represented by a hammer icon) in the toolbar.
- STM32CubeIDE compiles your project, and any errors or warnings will be displayed in the Problems view. Resolve any issues before proceeding.
- Once the build is successful, you are ready to flash the program to your STM32 board.
Advanced Features
Hardware Abstraction Layer (HAL)
Learn how the Hardware Abstraction Layer simplifies hardware-dependent coding. The HAL makes it possible to write code that is portable across different STM32 platforms.
Middleware Integration
STM32CubeIDE simplifies the integration of middleware, allowing you to add complex features like USB connectivity, a TCP/IP stack, or a file system to your projects.
Best Practices
Code Management
Adhering to best practices is key to maintaining a manageable codebase. We’ll discuss version control integration, modular design, and other strategies to keep your project organized.
Optimization Techniques
Optimizing your code for performance and efficiency is critical in embedded systems. We will cover techniques to make the best use of the resources available on STM32 boards.
Troubleshooting
Common Issues
Even the most experienced developers encounter issues. We’ll list common pitfalls and how to troubleshoot them, ensuring you can maintain momentum in your development process.
Getting Support
When you hit a snag, knowing where to find help can save the day. We will point you to resources and communities that offer support for developers working with STM32CubeIDE.
Conclusion
From Prototype to Production
Taking your project from a prototype to a production-ready product is an exciting phase. We’ll discuss the steps involved in this transition and how STM32CubeIDE supports this journey.
Continuous Learning
The learning never stops in the world of embedded systems. We will highlight ways to continue growing your expertise with STM32 and its development tools.
In this tutorial, we aim not only to instruct but also to instill confidence as you navigate through the rewarding path of STM32 development. Let’s power up STM32CubeIDE and set the stage for innovation and success.
Infographic