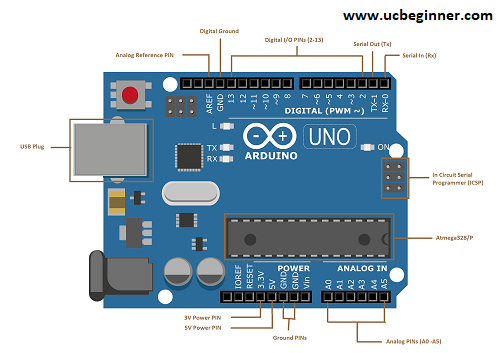
Arduino consists of both hardware and software that is available as an open-source platform. For those who are new to electronics and want to learn Arduino programming, Arduino is the best option. It combines circuits, coding, DIY, problem-solving, and creativity to bring ideas from different fields together. Here’s how to utilize the Arduino Uno board in its physical form. The Arduino Uno is one of the many development boards available. There are 14 digital input/output pins, 6 analog input pins, a power connector, a reset button, a USB connection, and an ICSP header on this device. Here you learn how to set up an Arduino programming environment step by step.

Download & install the Arduino environment (IDE)
In the first step, you must install Arduino IDE (Integrated Development Environment) and then code is typed into the IDE and transferred to Arduino via a USB cable. So, for downloading Arduino’s latest version go to the following link Arduino software. There are different versions available for Windows, Mac, and Linus OS.
First step
In the first step, you click on the installer option on the download page.
Second step
Now you save the download .exe file to your disk drive and then open it.
Third step
Click the button and accept the licensing agreement then Decide which components to put in, then click “Next”.
Fourth step
Choose which folder to put in the program, then click “Install”.
Fifth step
In the last step Wait a few seconds for the program to complete installation, then click “Close”.
Launch the Arduino IDE
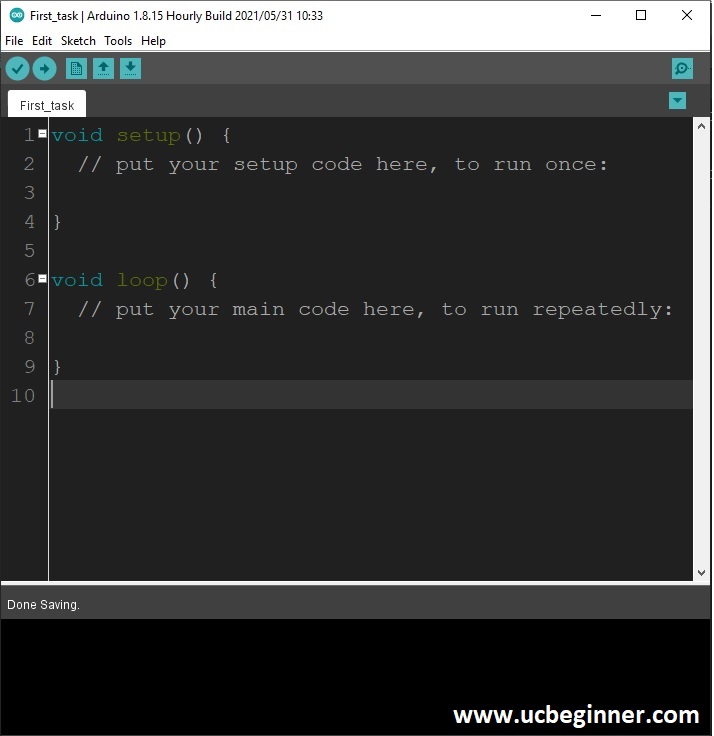
When Arduino downloads successfully then Unzip the Arduino IDE software folder. Double-click the Arduino shortcut on your Desktop to do so. The IDE will launch, and the code editor will appear.

Install the drivers
Go to the installed folder of Arduino IDE C:\Program Files (x86)\Arduino\drivers and open the dpinst-amd64.exe and install.
Connect the board to your computer via the USB cable
Connect your Arduino board to your computer via USB wire to power it up. On the board, the green power LED should be glowing.
Select your board
Before going to the next confirm that the software is compatible with your Arduino board. From the menu bar, select “Tools” from the computer menu. Select the “Board” option to open a new menu where you may choose your Arduino model from a list.
Select your serial port
Now select your serial port and go to the tools and then access the serial port menu. You may see COM3 or higher. The COM1 and COM2 are mostly preserved for hardware serial ports. Detach your Arduino board and reopen the menu to see which port this Arduino board is attached to. The Arduino board should be the one that vanishes. Reconnect the board and choose the serial port you previously selected.
Open the blink example
First, we start with the LED Blink example that comes with the Arduino IDE. Just select File->Examples->Basics->Blink from the File menu.
/*
  Blink

  Turns an LED on for one second, then off for one second, repeatedly.

  Most Arduinos have an on-board LED you can control. On the UNO, MEGA and ZERO
  it is attached to digital pin 13, on MKR1000 on pin 6. LED_BUILTIN is set to
  the correct LED pin independent of which board is used.
  If you want to know what pin the on-board LED is connected to on your Arduino
  model, check the Technical Specs of your board at:
  https://www.arduino.cc/en/Main/Products

  modified 8 May 2014
  by Scott Fitzgerald
  modified 2 Sep 2016
  by Arturo Guadalupi
  modified 8 Sep 2016
  by Colby Newman

  This example code is in the public domain.

  https://www.arduino.cc/en/Tutorial/BuiltInExamples/Blink
*/

// the setup function runs once when you press reset or power the board
void setup() {
  // initialize digital pin LED_BUILTIN as an output.
  pinMode(LED_BUILTIN, OUTPUT);
}

// the loop function runs over and over again forever
void loop() {
  digitalWrite(LED_BUILTIN, HIGH);   // turn the LED on (HIGH is the voltage level)
  delay(1000);                       // wait for a second
  digitalWrite(LED_BUILTIN, LOW);    // turn the LED off by making the voltage LOW
  delay(1000);                       // wait for a second
}
But here are some points to keep in mind while you write the code:
- The first thing the code is case-sensitive
- A semicolon must be used at the end of each statement
- Comments follow a // or start with /* and end with */.
- Two functions are required: void loop () and void setup ().
- When the Arduino board is initially turned on or reset, the setup part of the code is just run once.
- The loop repeats itself once the setup is complete.
- It will continue to operate till the board is turned off.
- The status bar indicates whether the software is being assembled or delivered.
- If there are any errors in the code, the programmed notice box displays them.
Upload the program
It’s now time to submit your first sketch (code). So, check that Arduino is plugged in, the green light is on, and you’ve picked the right board and port. From the Sketch drop-down menu, choose Upload. After uploading you’ll get a message Done uploading.
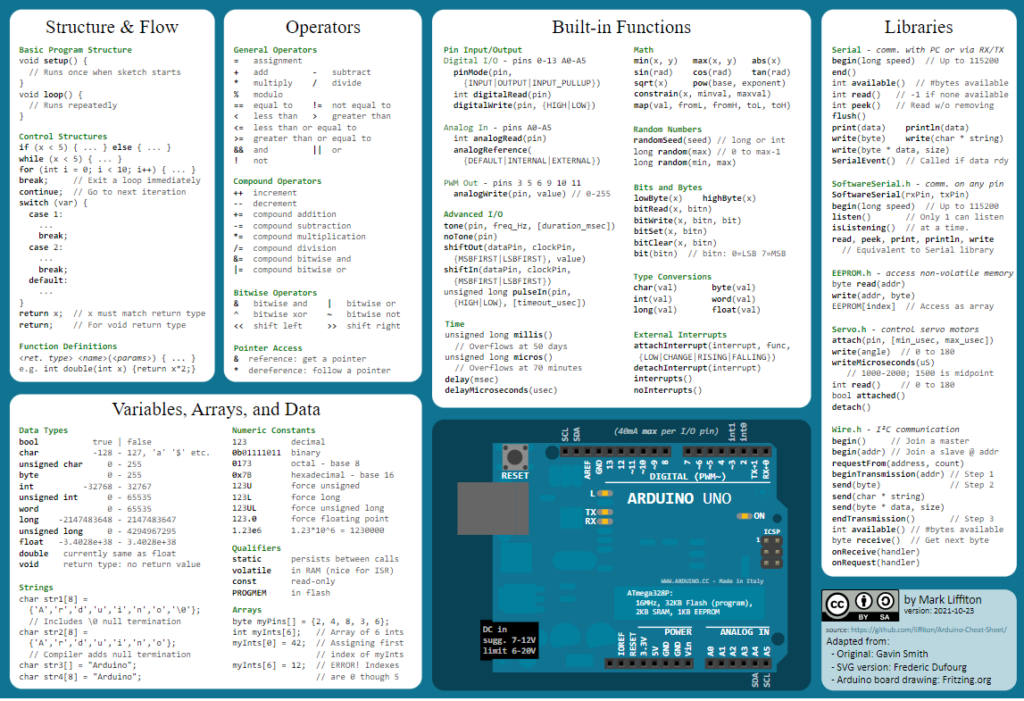
Arduino Programming Cheat Sheet

You can download the PDF file from GitHub.
