In today’s interconnected world, managing multiple IoT devices can be a complex and daunting task. Users often struggle with setting up seamless communication and control over their devices, leading to inefficiencies and frustration.
Enter Arduino IoT Cloud: the ultimate solution for building and managing your IoT ecosystem effortlessly. This guide will walk you through the process of setting up and harnessing the power of Arduino IoT Cloud, allowing you to control and monitor your connected devices with ease. Let’s explore how you can simplify your IoT network and unlock its full potential.
Before we begin, let’s understand some basic concepts:
- IoT (Internet of Things): It refers to a network of physical objects embedded with sensors, software, and connectivity, allowing them to collect and exchange data.
- IoT Cloud: It is a platform or service that enables the storage, management, and analysis of data collected from IoT devices.
- Arduino IoT Cloud: It is an IoT cloud platform provided by Arduino, specifically designed to work with Arduino boards and devices.
To make an IoT cloud and use it with Arduino IoT Cloud, we’ll follow these steps:
Step 1: Sign up for Arduino IoT Cloud
To get started, visit the Arduino IoT Cloud website and create an account if you don’t already have one. Once you’re signed in, you’ll gain access to the Arduino IoT Cloud Platform, where you can manage your devices, create dashboards, and explore various IoT features.
- Visit the Arduino IoT Cloud website and sign up for an account.
- Once signed in, you’ll have access to the Arduino IoT Cloud platform.
Step 2: Create Thing in Arduino IoT Cloud
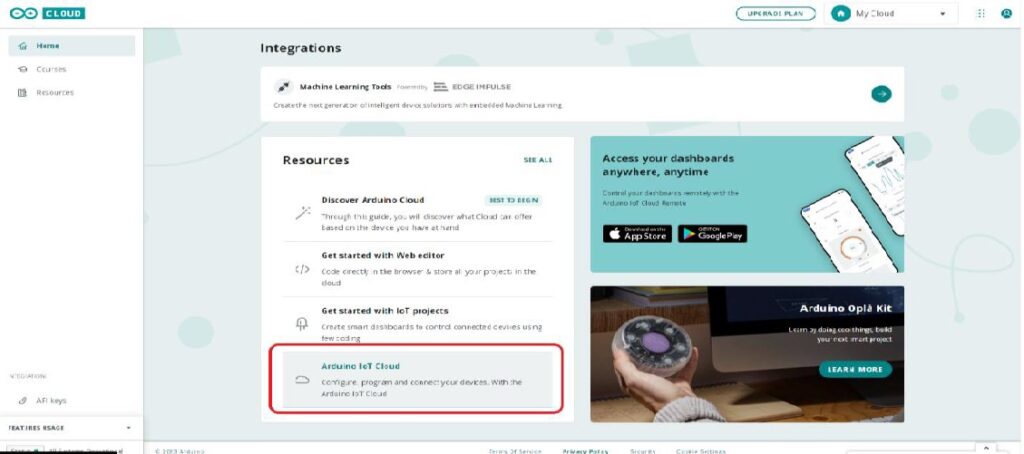
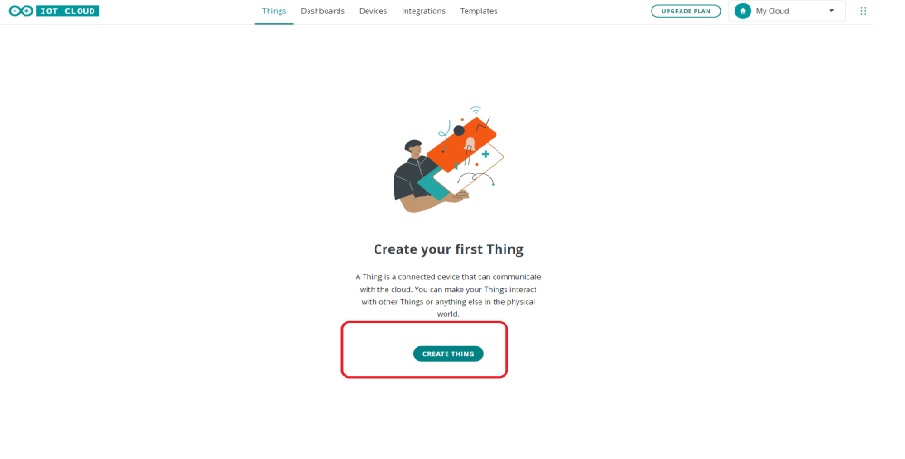
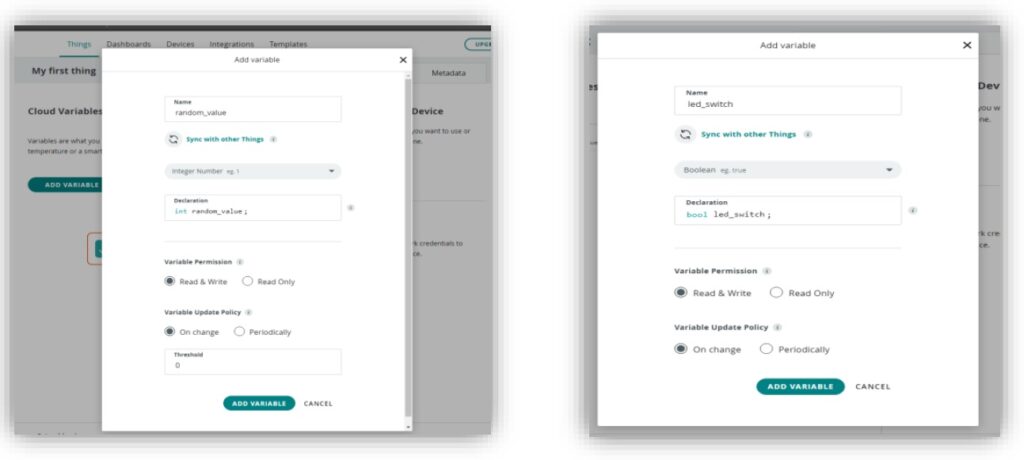
In Arduino IoT Cloud, you need to create an object, which represents your connected device. Click on “Arduino IoT Cloud” and select “Create Thing”. Add variables to your object, such as an integer for random values and a boolean for LED switches. These variables will enable you to control and monitor specific aspects of your device.
- Click on Arduino IoT Cloud.
2. Create Thing.
3. Add variables (int random_value; bool led_switch;)
Step 3: Add your Device to Cloud
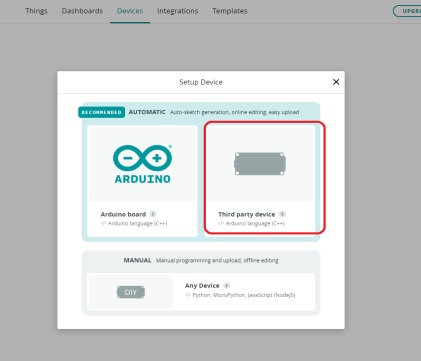
In the “Device” section, add your device (eg, WROOM ESP32 Devkit) by entering the necessary details. Copy the Device ID and Secret Key provided. Check the box indicating that you have saved your device ID and secret key, and click “Continue” to continue.
You can purchase WROOM ESP32 Devkit from:
- Go to the device and add the device (In our case WROOM ESP32 Devkit).
- Copy Device ID ( d4-ef-47-8834-c9a7e1) and Secret Key: ( K**… 7 )
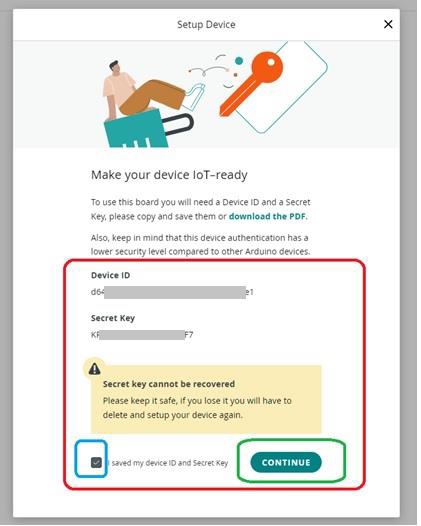
- Tick the box ( I saved my device ID and Secret Key ) and click on “CONTINUE”.
Step 4: Associate Device with Thing.
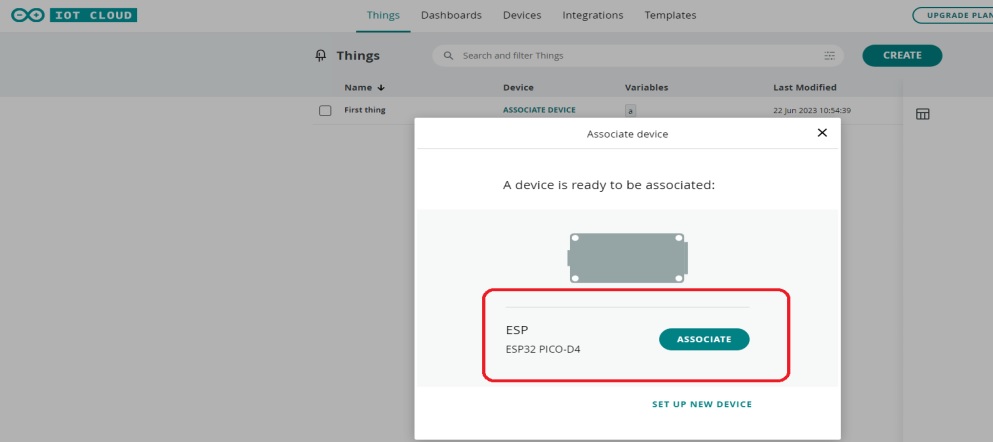
Go to the “Things” section and click on “Associate Device”. This step ensures that your device is connected to the one you created earlier, establishing the necessary connections for data transfer and control.
- Goto Thing and click on the associate device.
Step 5: Download Sketch and Upload to Your Device.
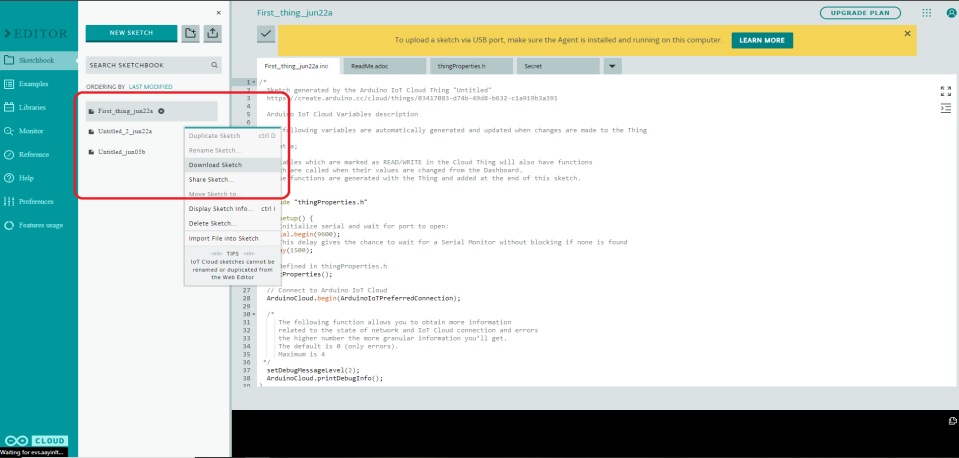
Access your object and click on the “Sketch” option. Open the full editor in a new tab and download the provided diagram. In the Arduino IDE, install the Arduino IoT Cloud library by going to “Sketch” -> “Include Library” -> “Manage Libraries” and searching for “ArduinoIoTCloud”. Restart the IDE. Connect your Arduino board (eg WROOM ESP32 Devkit) to your computer via USB, extract the downloaded zip file, unzip the .ino file, and enter your Wi-Fi credentials and device key. Upload the code to your board.
- Click on your thing then on sketch.
- Open the full editor in a new tab.
- Download sketch.
Step 6: Connect Arduino Board to IoT Cloud
After uploading the code, refresh the Arduino IoT Cloud platform to confirm that your device has successfully connected to the Arduino Cloud. This step ensures a reliable connection between your Arduino board and the IoT cloud, enabling seamless communication protocols in IoT.
- Install the Arduino IoT Cloud library in the Arduino IDE. To do this, open the Arduino IDE, go to “Sketch” -> “Include Library” -> “Manage Libraries” and search for “ArduinoIoTCloud.”
- Install the library and restart the Arduino IDE.
- Connect your Arduino board to your computer using a USB cable.
- Extract the downloaded zip file and open the .ino file.
- Enter the WiFi name (SSID), WiFi Password, and Device key(you have copied earlier) in Arduino_secrets.h tap on Arduino IDE.

- Copy and paste the following modified code.
#include "thingProperties.h"
#include <sys/random.h>

int LED = 2;

void setup() {

   pinMode(LED, OUTPUT);

  // Initialize serial and wait for port to open:
  Serial.begin(9600);
  // This delay gives the chance to wait for a Serial Monitor without blocking if none is found
  delay(1500);

  // Defined in thingProperties.h
  initProperties();

  // Connect to Arduino IoT Cloud
  ArduinoCloud.begin(ArduinoIoTPreferredConnection);

  /*
     The following function allows you to obtain more information
     related to the state of network and IoT Cloud connection and errors
     the higher number the more granular information you’ll get.
     The default is 0 (only errors).
     Maximum is 4
 */
  setDebugMessageLevel(2);
  ArduinoCloud.printDebugInfo();
}

void loop() {
  ArduinoCloud.update();


 // Your code here
  random_value = random(0, 500);
  delay(500);

}
/*
  Since RandomValue is READ_WRITE variable, onRandomValueChange() is
  executed every time a new value is received from IoT Cloud.
*/
void onRandomValueChange()  {
  // Add your code here to act upon RandomValue change
}

/*
  Since LedSwitch is READ_WRITE variable, onLedSwitchChange() is
  executed every time a new value is received from IoT Cloud.
*/
void onLedSwitchChange()  {
   // Do something
  if(led_switch){
    digitalWrite(LED, HIGH);
  }
  else{
    digitalWrite(LED, LOW);
  }
}
- Upload the code to your Arduino board (In our case ESP32 PICO D4).
Step 7: Refresh the webpage
Refresh the Arduino IoT Cloud’s device webpage.
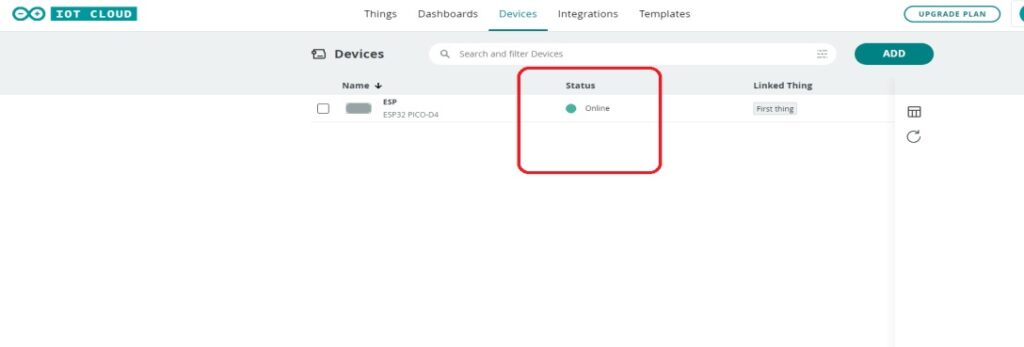
The device is successfully connected to the Arduino cloud.
Step 8: Set up Arduino IoT Cloud Dashboard
In the “Dashboards” tab of Arduino IoT Cloud, you can create a custom dashboard to control and monitor your devices. Click the “Build Dashboard” button and edit it as needed. Add widgets, associate them with your object, and customize their appearance and functionality to your preferences.
- First, navigate to the “Dashboards” tab.
- Then, click on the “Build dashboard” button.
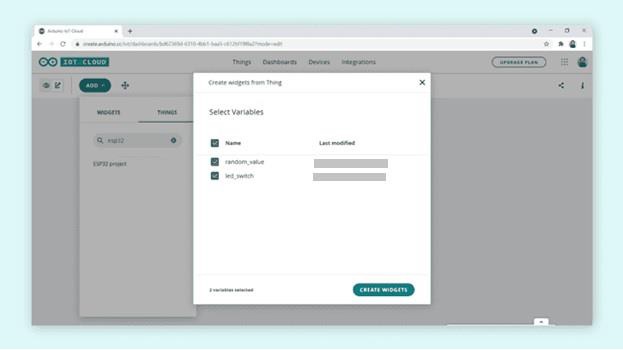
To modify the dashboard, you can click on the pencil icon located in the top left corner. Then, choose “Things” and search for your specific Thing. Once you’ve found it, select it and click on “Add widgets” as indicated in the accompanying image.
Step 9: Test and Monitor Your IoT Device
- Once you have your dashboard set up, you can interact with your Arduino board and monitor its data.
- Use the interface elements on the dashboard to control your device remotely (you can ON/OFF LED of ESP from Arduino IoT cloud).
- Monitor the data from your device, such as sensor readings, through the Arduino IoT Cloud platform (In our case Getting random values from the ESP32 module).

Congratulations! You have successfully set up an IoT Cloud and used it with Arduino IoT Cloud. Now you can extend this foundation by adding more devices, creating automation rules, and integrating with other services.
Remember to refer to the official Arduino IoT Cloud documentation and resources for more in-depth information and advanced features.
Conclusion
By following these steps, you have successfully established an IoT cloud using Arduino IoT Cloud. You can now control and monitor your connected devices seamlessly, opening up a world of possibilities for automation and data-driven decision-making. Explore the official Arduino IoT Cloud documentation for further guidance and advanced features to enhance your IoT projects.
