This circuit takes serial inputs one bit at a time and outputs them parallel or simultaneously on all output pins. An IC like the 74HC595 Shift Register is a 16-pin SIPO (SIPO stands for Serial In, Parallel Out). As soon as new input is received, the previously stored input shifts to the subsequent output, and the newly entered data come onto the reset pin. The data slides into the serial input pin and continues to the reset output pin until another input is received. Generally, shift registers are used to store data, and this property of the records is also applied here.
An example of a real-world application of shift registers is the Nintendo Virtual Console controller. Switch records by the central controller of the Nintendo Entertainment System to get all button presses serially.
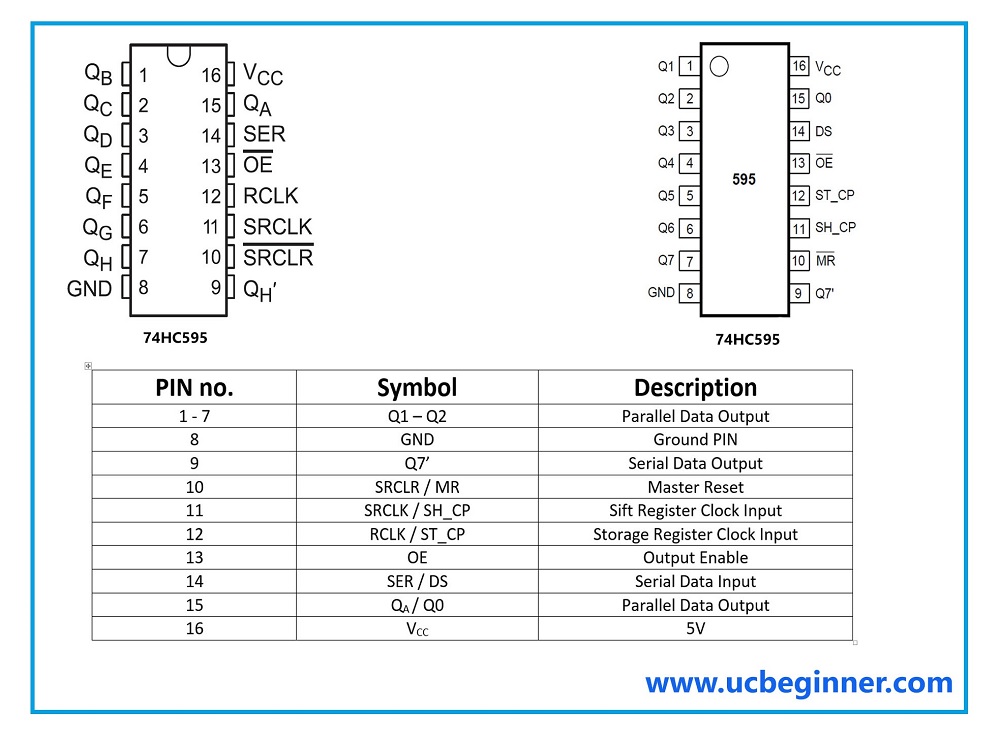
PIN Configuration of 74HC595
We will discuss the pinout of Texas Instruments SN74HC595N IC here, which is available in various models and varieties.

Control 7 Segment with 74HC595 using Arduino
A few materials are needed: Arduino mega, Seven Segment Display, 74HC595 Shift Register IC, and Jumper cables. We can also simulate this on Proteus, here will simulate controlling 7 segment with 74HC595 using Arduino mega.
Arduino Programming to Control a Seven-Segment Display
In this phase, we will program the Arduino mega to show various numerals on the Seven Segment Display. The procedure is as follows:
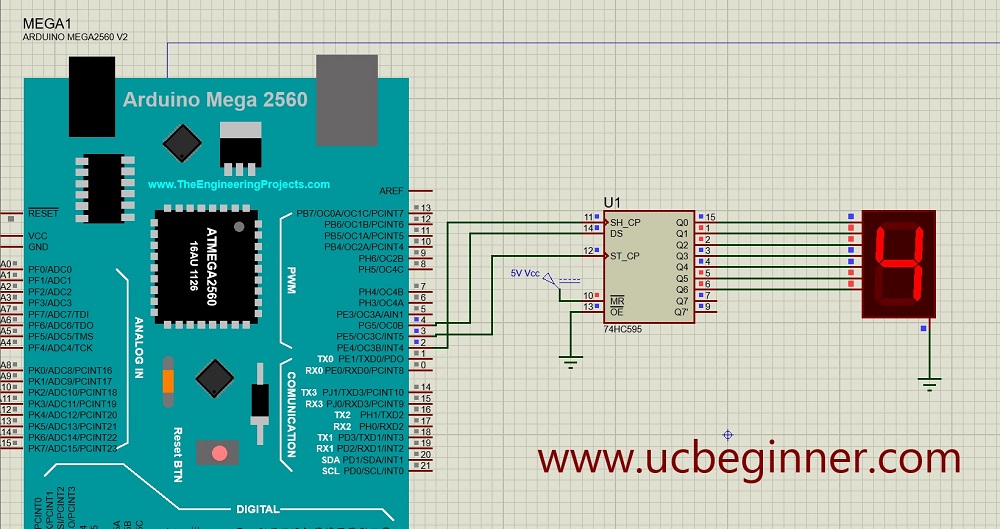
Make a new Proteus project connect Arduino mega with 74HC595 as follows,
- Attach Arduino PIN no. 2 with SRCLK / SH_CP PIN of 74HC595
- Attach Arduino PIN no. 3 with RCLK / ST_CP PIN of 74HC595
- Attach Arduino PIN no. 4 with SER / DS PIN of 74HC595
Note: You have to download Arduino mega library for Proteus.
Arduino code for 74HC595 7 segment
The following code is print 4 on the 7 Segment display.
/*
 *  https://ucbeginner.com/arduino-interface-with-74hc595-shift-register/
 *          Control 7 Segment with 74HC595 using Arduino
 */

/*
 * no to be printed on 7 Seg
 *          --A--
 *        `      `
 *        F      B
 *        `      `
 *          --G--
 *        `      `
 *        E      C
 *        `      `
 *          --D--
 *
 *                   x G F E    D C B A    x x x  x     1  2  3  4
 *bool data_b[16] = {0,0,0,0   ,0,1,1,0   ,0,0,0, 0    ,1, 0, 0, 0};
 *                   0 1 2 3    4 5 6 7    8 9 10 11    12 13 14 15
 */


int clk   = 2;    // Attach SH_CP
int latch = 3;    // Attach ST_CP
int data  = 4;    // Attach DS


char val = '4'; // 4 will be dispaly on 7 Segment
bool data_a[16] ;

#define A 7
#define B 6
#define C 5
#define D 4
#define E 3
#define F 2
#define G 1

void setup()
  {
  pinMode(clk,OUTPUT);
  pinMode(data,OUTPUT);
  pinMode(latch,OUTPUT);
  digitalWrite(latch,HIGH);
  digitalWrite(clk,LOW);
 }

void loop()
  {
   Seven_seg(val);
  }


  void Seven_seg(char no)
{
  data_a[0] = 0;
  data_a[8] = 0;
  data_a[9] = 0;
  data_a[10] = 0;
  data_a[11] = 0;

  data_a[12] = 1;
  data_a[13] = 0;
  data_a[14] =0 ;
  data_a[15] = 0;

 if(no == '1')
   {data_a[A]=0;
    data_a[B]=1;
    data_a[C]=1;
    data_a[D]=0;
    data_a[E]=0;
    data_a[F]=0;
    data_a[G]=0; }

 if(no == '2')
   {data_a[A]=1;
    data_a[B]=1;
    data_a[C]=0;
    data_a[D]=1;
    data_a[E]=1;
    data_a[F]=0;
    data_a[G]=1;}

 if(no == '3')
   {data_a[A]=1;
    data_a[B]=1;
    data_a[C]=1;
    data_a[D]=1;
    data_a[E]=0;
    data_a[F]=0;
    data_a[G]=1;}

 if(no == '4')
   {data_a[A]=0;
    data_a[B]=1;
    data_a[C]=1;
    data_a[D]=0;
    data_a[E]=0;
    data_a[F]=1;
    data_a[G]=1;}

 if(no == '5')
   {data_a[A]=1;
    data_a[B]=0;
    data_a[C]=1;
    data_a[D]=1;
    data_a[E]=0;
    data_a[F]=1;
    data_a[G]=1;}

 if(no == '6')
   {data_a[A]=1;
    data_a[B]=0;
    data_a[C]=1;
    data_a[D]=1;
    data_a[E]=1;
    data_a[F]=1;
    data_a[G]=1;}

  if(no == '7')
   {data_a[A]=1;
    data_a[B]=1;
    data_a[C]=1;
    data_a[D]=0;
    data_a[E]=0;
    data_a[F]=0;
    data_a[G]=0;}

  if(no == '8')
   {data_a[A]=1;
    data_a[B]=1;
    data_a[C]=1;
    data_a[D]=1;
    data_a[E]=1;
    data_a[F]=1;
    data_a[G]=1;}

 if(no == '9')
   {data_a[A]=1;
    data_a[B]=1;
    data_a[C]=1;
    data_a[D]=0;
    data_a[E]=0;
    data_a[F]=1;
    data_a[G]=1;}

 if(no == '0')
   {data_a[A]=1;
    data_a[B]=1;
    data_a[C]=1;
    data_a[D]=1;
    data_a[E]=1;
    data_a[F]=1;
    data_a[G]=0;}

  for(int i=0; i <9 ; i++)
      {
        digitalWrite(clk, HIGH);
        digitalWrite(data, data_a[i]);
        digitalWrite(clk, LOW);
      }
   digitalWrite(latch,LOW);
   digitalWrite(latch,HIGH);
  }
Output:

How much power does a 7-segment display use?
Each section has a 20mA maximum rating (10mA recommended). If all seven segments are lighted, in addition to the “dot” on two of the numbers, the power usage (at 10mA) is, of course, 80mA. If turned up to its highest rating, it might be as high as 160mA.
Conclusion
Following all these steps, you may create a project like the one above. You may also attempt the same build without the Shift register IC to see how this IC can assist you in providing outputs to several objects at once while utilizing fewer GPIO pins. Try daisy-chaining many of these ICs to control a considerable number of sensors or devices. I hope you enjoyed this tutorial.
